- Get link
- X
- Other Apps
It's been a long project. I started this properly at the beginning of the first lockdown, and tomorrow we start the second one.
Anyway, I'm really close with this one.
I retook my measurements (that really is the hardest thing to do with pattern cutting!) and redrafted. My breasts are 2 cup sizes apart, which is neither here nor there except that the cup patterns are different and, according to Bare Essentials, one is 12mm wider than the other.
So What Have I Learned?
Stretch-and-Lift Split
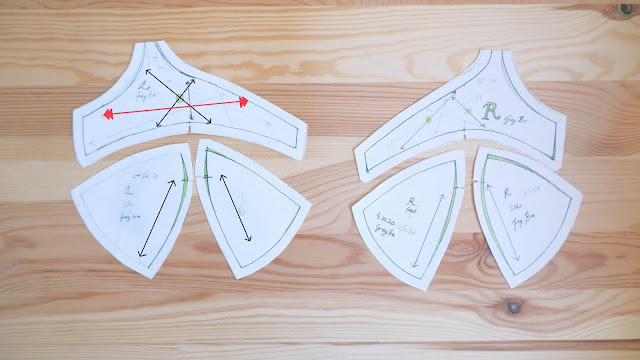
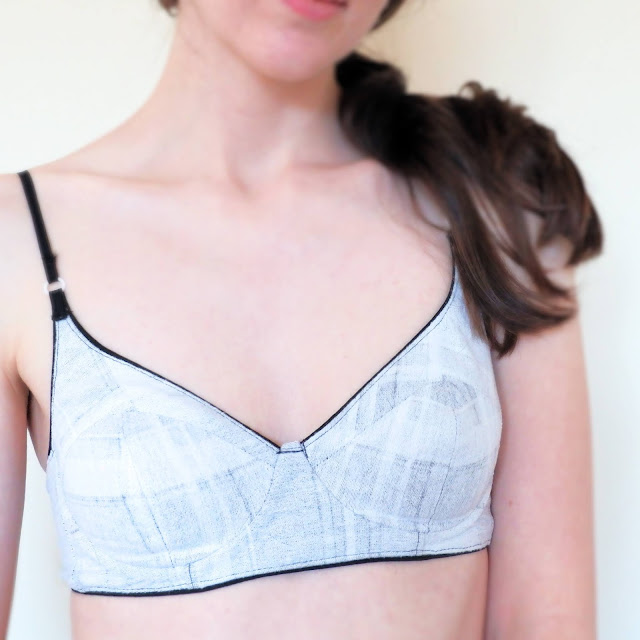
A big thing I realised is that half the cup has to be on the bias, and half the cup has to be on the straight grain, with the straight grain being where you want support/lift. You can see it reasonably well in with this bra because it's tartan. I have the straight grain on the lower cup and the bias on the top cup. This means the non-stretching straight grain is lifting/squishing me up, and the bias upper cup allows the flesh to fill into it.
 |
| The red line is Direction of Greatest Stretch (DoGS), and the black ones are grainlines. The green sections are where I smoothed out pointiness. |
Direction of Greatest Stretch (DoGS) and Grainline are both Important
DoGS is not a standard industry term, but it's prevalance in the home sewing community speaks of the value of the concept. As you can see in the above photo of my pattern, I have straight grain across the lower cup, and bias across the upper cup.
If you have the stretchy bias across the lower cup, it will shape around your breasts, rather than hold them up. Even at my size, that's not the look I'm going for, so I put the straight grain there to hold me up. It helps me to use the idea of a straight grain here, because in my mind, that is the strongest grain on the fabric and it makes sense that it restricts movement.
The top cup is on the bias. The flesh has to go somewhere or the bra will be, in effect, too small. This is what happened with my pink bra (really must document that...). It looks like my breasts are being cut in two. It helps me to think that I want the stretch there, and then draft the grainline in around that (being 45° from the bias).
I've only made one bralette in stretch fabric so far. I have many fabrics to try...
If there is a point in your pattern, it will be in your bra
You can make a bra cheaply with very simple notions and scrap fabric
 |
The inside of the bra: bias binding instead of underwire casing, buttons instead of hook-and-eye closures, and very basic elastic. Needs a lining to be finished properly, but that's for next time. |
Several goes back, I did make a bra with a kit of findings (and neglected to blog about it because the fit wasn't right). I will make another one at some point and wrap this project up, but I did find it difficult to get the underwire casing to lie flat. The strap elastic also wasn't great and has gone wobbly, and the colours weren't quite what I'd like. So I've made my later bras with scrap fabric and notions I already had, like plain corded black elastic on a huge spool, bias binding for underwire casings, and buttons instead of hook-and-eye closures. And you know what? They're fine!
I would like to try making a bra with some of that power net and actually line my future bras. I want to make just one or two more to really make sure my pattern is right before I buy anything.
Given this bra was made from scrap bedding, I estimate the cost at about £2 or so. Maybe less. I have no idea how much the buttons cost; I've had them for years.
(See also here: Colette Patterns)
Draw curves by eye
I've tried the curves maths and bra making calculators on Bare Essentials, but for the life of me I can't get my head around the curves maths. It just doesn't make sense to me, perhaps because, with my being so 'modestly endowed' I have virtually no curves to add anyway. I know from toiling that my front cups have virtually no volume, and that 6 mm or less in the lower cup is plenty for me. So I just draw in enough to give an un-conical cup, and adjust if needed while sewing.
As they say on Savile Row, "It's mostly rock of eye."
You don't even need a zigzag stitch
Now, this is for woven fabrics. Very stretchy ones will need a zigzag stitch at the very least.
The bra in this post sewn with just a straight stitch, except for the buttons/holes, and the bar-tacks on the straps. The latter could have been sewn with a straight stitch, and the buttonholes could be replaced with hook and eye closures, or bound buttonholes. So a very simple machine will do.
It's even fine for the elastic on a woven bra. Just keep the elastic taut when you sew and you don't even have to measure it. This saves so much bother.
Top-stitching and pressing really matter
It really is the difference between a well-fitting bra, and one that looks like a complete failure. I was convinced this bra didn't fit, until I pressed it. Top-stitching made the seam allowances behave too. Use a tailors' ham.
What's Next?
I'm going to make one or two more wearable toiles just to be sure, and then I intend to make a proper one, i.e. with proper notions and maybe a lining. I'm going to call that the official Part 2 of the Bra.
For now though, I think it's time to do something a bit different. I'm expanding Project RTW by developing the YouTube channel. I'm going to do tutorial videos (not on bras). Subscribe here ;)
Comments


I've enjoyed reading about your bra making projects thus far, and I've appreciated seeing all your bras using woven fabrics. I've only tried making bras with stretch knits so far, but I want to try a woven fabric next time, so it's been helpful for me to see your approach and results. I really like your resourcefulness with the button closure! I look forward to following along your future projects. :)
ReplyDeleteThank you Suzanne! It's so nice to know people enjoy and get help from my posts! :) I'm a little intimidated to make a bra from stretch fabric because the fit seems to change every time use a different fabric, even in wovens.
Delete