- Get link
- X
- Other Apps
I tried the Porcelynne draft and it sort of worked. But for some reason that I can't now remember, I didn't like it enough and tried again. I compared my pattern to the ones in the back of the book. It was much smaller than even the smaller A cup, and I'm definitely an A cup, right? I mean, I'm tiny. I've worn a 32A since I was 13. This, and a few more attempts at drafting and understanding the maths in it (I love maths), led me down the rabbit hole that is bra sizing.
Now, it turns out there are different ways of arriving at a bra size. This lady explains (note: not me):
So, I'm actually a 26 DD. Which is, if not a unicorn, certainly a very brightly coloured horse with sparkles that lives in Narnia. I tried looking online to see if there were any. Not a lot. Tesco starts at 32A (and where else can you try bras now anyway?)
So the only thing left to do is make them.
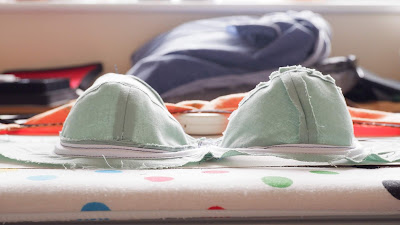
I took some underwires out of my decrepit bras and sewed them to the toile. I used bias binding because I don't have any proper channelling.
Bra Sizing
Oh my what a thing bra sizing is. The traditional way catalogues in the UK tell you to get your bra size is to add 4-5" to your underbust measurement, and take that number away from your full bust measurement. That leaves me with a 30A (or 32 something with a negative cup size if I measure as I always had done, over my shoulder blades.)Now, it turns out there are different ways of arriving at a bra size. This lady explains (note: not me):
So, I'm actually a 26 DD. Which is, if not a unicorn, certainly a very brightly coloured horse with sparkles that lives in Narnia. I tried looking online to see if there were any. Not a lot. Tesco starts at 32A (and where else can you try bras now anyway?)
So the only thing left to do is make them.
Porcelynne draft
Once I measured myself properly (that ribbon around your overbust is vital), I got a successful draft. I did change the method slightly just to make it easier, but not enough to change the results, I think.
It turns out that like most women, I have uneven breasts. The difference is enough to mean I need a separate pattern for left and right.
The fit
First, sans underwire:
 |
| It stands out a bit between the boobs without underwires. |
 |
| Nice, smooth fit. |
 |
| My wires have to touch. The smaller cup is slackening a bit, or rather, the band is at the side because I didn't use any elastic. Quilting cotton stretches, apparently. |
 |
| The bit with the wires pretty much touch now. Close enough. I might need to let off a bit in the neckline to let them sit better. |
Comparing drafts
These are arranged so that the bands match. What strikes me is how much narrower the bust span is on the bra than on the bralette. I also prefer distance between the straps on the orange one. Despite being quite light bras, they feel supportive and comfortable. I've been test-driving them for a while now, and the green one has given quite a lot in the band, which is a good reason to make bras from stretch fabric with negative ease, rather than from quilting cotton.
I'm quite happy with the fit of both of them.
I scanned in both patterns. Above you see the bralette pattern (the orange one), drafted from my dress pattern. I've drawn on it approximately where the extra was added to the front cup. That's why the cup appears to go up so much at the CF on the pattern. It doesn't that much in real life.
The pattern looks a bit confusing, too, in that it looks like the strap is part of the cup. It isn't. Look at the little drawing (not the blue one) to see how it looks.
...
So I spent the next while working on bra maths (and had a bit of an Aspergic episode that resulted in my being sleep deprived for a few days).
Oh, and here's why bust height and "Vertical Measurement" need to be measured accurately
I drafted this using Porcelynne, but I evidently hadn't measured myself properly, and the result is horrendous:
 |
| I honestly don't look like that. |
 |
| See how much extra room there is because I didn't measure myself properly? |
The saga continues...


Comments
Post a Comment