- Get link
- X
- Other Apps
There are many tutorials online for sewing a t-shirt but none of them give a result that looks like RTW. I didn't manage to get it quite right while I was at college, and it always annoyed me that I hadn't got the standard right. Which is why t-shirts are in Project RTW.
There are some videos on YouTube that are incredibly helpful, which I keep linking to. They are the starting point or spring board for getting a professional RTW finish on my knit garment necklines.
Two Ways to Finish a Knit Neckline
One is to bind the back neckline, and the other is to bind from shoulder to shoulder. The latter, I think, looks higher quality, perhaps because it stabilises the shoulders too. I would do that on a t-shirt that has set-in sleeves. My nightie has raglan sleeves, so I chose to just bind the back neckline.
Specs and Tools
In factory sewing, things work because the patterns' and the machines' measurements agree. They have individual machines to do various jobs. We at home don't. We do, however, have interchangeable presser feet for our sewing machines. If we're lucky, we also have overlockers/sergers.
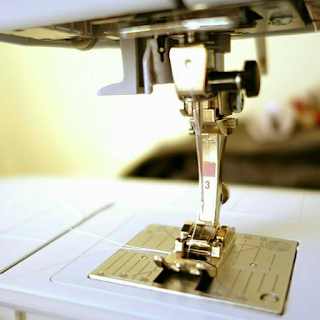
I have a basic Toyota SLR4D-SL1 overlocker. It's not amazing, but it does the job if I work with its limitations. My sewing machine is a Bernina B380, which is relatively basic but it has a knee-lift (which is great), and the foot that I use for knit necklines: manual buttonhole foot #3.
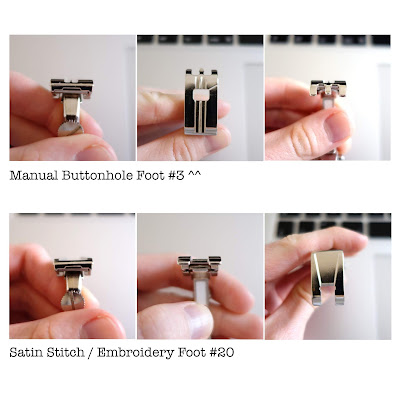
Manual Buttonhole Foot #3
I tried most of my presser feet when I was making samples. Most of them moved the fabric around and made a messy job of it. I tried the satin stitch foot, which kept things in line, but didn't hold the fabric down enough. So I tried the manual buttonhole foot.
This works better because it has tunnels underneath for the rows of zigzag stitches on a buttonhole. These tunnels keep the fabric of the binding down, while the general shape of the bottom of the foot help guide it along the binding. Using that with the ability to move the needle means I can edge-stitch where I want with a consistent distance from the folds.
This works better because it has tunnels underneath for the rows of zigzag stitches on a buttonhole. These tunnels keep the fabric of the binding down, while the general shape of the bottom of the foot help guide it along the binding. Using that with the ability to move the needle means I can edge-stitch where I want with a consistent distance from the folds.
Some other brands make manual buttonhole feet for their machines, but if yours doesn't I think a cording foot would work too.
The Pattern
Your pattern will consist of at least four parts: the front and back body, the neckline ribbing, and the binding. My pattern has raglan sleeves so there were two more bits on the neckline. Moving on.
You will need to put your pattern pieces together like this (without seam allowances):
 |
| Ignore the sticky-outy bit. |
Click here for a free sample pattern. Note: the ribbing pattern in the diagram is only working out measurements; it will not be used after this step because we are going to draft a nice, simple rectangle.
Ignore the little sticky-out bit at the front. I was experimenting. It turned out to be unnecessary.
You can see that I have drawn the ribbing in. It's 1.2cm (1/2") wide. Measure along the new neckline. This is the measurement of the ribbing, but it has to be adjusted for stretch and recovery.
Stretch is obviously how far the fabric can comfortably stretch. Recovery is how well it goes back to its original size and shape. Elastic bands have good recovery. Pizza dough does not (always).
You'll need your actual fabric for this as all jerseys vary.
Working Out How Long to Make Your Ribbing
- Fold your fabric in half with the greatest stretch along the fold.
- Mark on it 2 cm in and then 22 cm, so that your marks are 20 cm apart.
- Give it a good stretch, like you would to a new balloon, and about as much as you think the garment would get stretched in use.
- Measure the distance between the two marks.
- Divide that measurement by the original 20 cm to get the percentage. In my case 21.6 cm ÷ 20 cm = 108%
- Now take the measurement of your new neckline, in my case 23.3 cm.
- Divide that by the percentage (108): 23.3 cm ÷ 108 x 100 = 21.6 cm (1 d.p.)
- Double that to get your whole neckline (we've been working with the pattern which is half the real garment). = 43.2 cm.
- Add 2 cm seam allowance = 45.2 cm. This is how long your ribbing pattern will be.
- The width will be 1.2 cm + 1.2 cm + 0.7 cm + 0.7 cm (seam allowances) = 3.4 cm. I might round up a couple of mm, giving 3.7 cm or so, in order to deal with that little bit of vertical shrinking that happens as you stretch something horizontally.
So you will cut a rectangle that is 3.7 cm tall by 45.2 cm in the jersey and the stretch stabiliser. Fuse together.
 |
| Cutting a rectangle of fabric that is 20cm wide |
 |
| Now that it's been stretched like a new balloon, it's 21.5cm wide. |
Now for the 4th pattern piece: the binding. If it's the shoulder-neck-shoulder kind, you measure all along those seamlines and cut a piece that long by 2 cm. If you're just binding the back neck, measure the length of the area you want to bind (it will be a bit wider than is visible when the garment is hung), and cut a piece that long by 2 cm. Now cut the ends into curves, so you have a shape a bit like a saucer. The curves will go about 2 - 2.5 cm in.
 |
Sewing the neckline
- Sew the shoulder seams on the garment.
- Sew the two short ends on the ribbing together. If you are sewing a v-neck, you will want to sew this seam in an inward-pointing shape, as shown above, and cut off the extra bit (shaded), leaving a 6 mm seam allowance.
- Snip into the V seam allowance, to but not through the stitching right at the point.
- Fold in half lengthways, wrong sides together so that it looks as it will when you wear it. You will get a neater finish if you fold the seam allowances open or two to each side so it looks like they had an argument. It divides the bulk evenly.
- Mark the CB with a tiny notch, no bigger than 3 mm as you have only 6 mm seam allowance.
- Mark the CB on the neckline in the same way if you haven't already.
- If sewing a v-neck, machine baste the ribbing in place at the V first so that it is neat and aligned.
- Overlock the ribbing onto the neckline, RS together, stretching the ribbing to fit the neckline, and matching the CB notches.
Binding the neckline: back-neck binding
- Lay the t-shirt inside out at your sewing machine with just the seam allowance of the neckline to the right for sewing.
- Centre the neck binding over the back of the neckline, its long, raw edge even with the overlocked edge of the neckline, RS tog.
- Starting on the neckline stitching on the t-shirt, sew the binding to the t-shirt, keeping that seam allowance, extending past the end of the binding at the other end, overlapping the stitches, and backstitching.
- Fold the binding along this seam to cover the seam allowances. Edge stitch the binding to the seam allowances, 1.5 - 2 mm from the seam.
- Flip the back of the t-shirt to the right-hand-side of the needle, so that you have the front of the t-shirt to your left, and the back of it to your right, WS up.
- Wrap the binding round the seam allowances, and edge stitch it down with the needle on the other side of the presser foot if possible. ES 1.5 - 2 mm away from the left-hand fold of the binding. If using a label, add it while sewing this step.
- Turn the t-shirt RS up and topstitch the rest of the neckline, joining the stitching from the binding stitches, but narrowing to 3mm from the actual neckline seam.
- Press and admire.
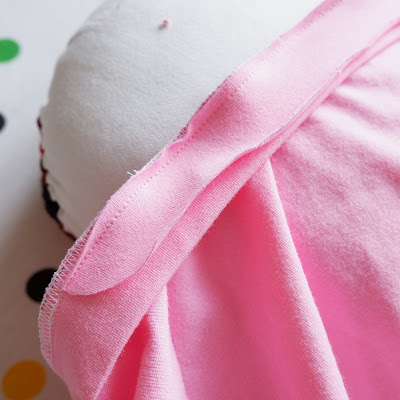 |
| The binding is stitched to the neckline along the original seam allowance along its straight edge. |
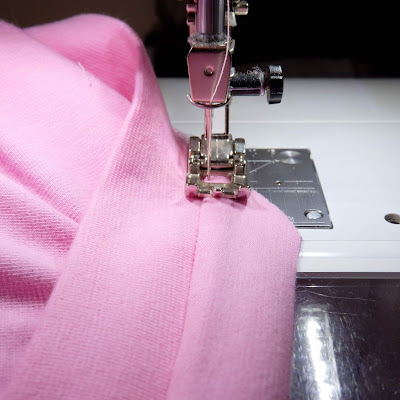 |
| Under-stitching the neckline binding. |
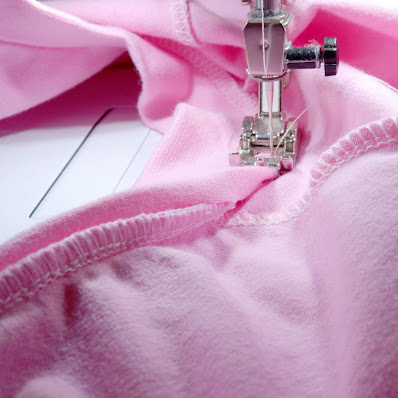 |
| Close-up of the neckline binding being wrapped around the neckline seam allowance. |
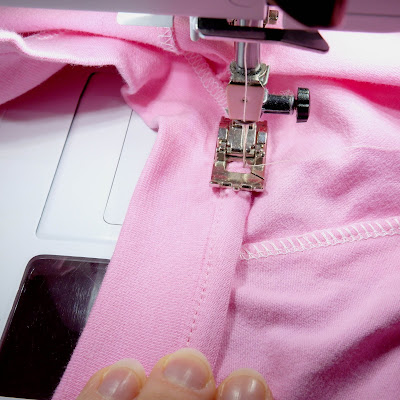 |
| The neckline binding is wrapped round the seam allowance and is being sewn down with Bernina manual buttonhole foot #3. |
Binding the neckline: shoulder-neck-shoulder binding
- Lay the t-shirt inside out at your sewing machine with just the seam allowance of the shoulders and neckline to the right for sewing.
- Lay the binding over the shoulder seamline, its long, raw edge edge with the overlocked edge of the shoulder seam, RS tog.
- Sewing on the shoulder seamline, sew the binding to the t-shirt.
- When you get to the bit where the shoulder meets the neckline, you will have to jiggle things about a bit with the needle down and the presser foot up. Sew as neatly as you can, doing the same at the other intersection, and continue to the other shoulder point.
- Fold the binding along this seam to cover the seam allowances. Edge stitch the binding to the seam allowances, 1.5 - 2 mm from the seam. NOTE: You can do this bit with the t-shirt flat if you wish (with the back of the t-shirt to the right, and the front to the left) so that you will sew through the outside of the t-shirt two, giving two rows of top-stitching.
- If you haven't already, flip the back of the t-shirt to the right-hand-side of the needle, so that you have the front of the t-shirt to your left, and the back of it to your right, WS up.
- Wrap the binding round the seam allowances, and edge stitch it down with the needle on the other side of the presser foot if possible. ES 1.5 - 2 mm away from the left-hand fold of the binding. If using a label, add it while sewing this step.
- Turn the t-shirt RS up and topstitch the rest of the neckline, joining the stitching from the binding stitches, but narrowing to 3mm from the actual neckline seam.
- Press and admire.
So that is how I do jersey necklines that look like RTW t-shirts. :) I hope that helped you!
Resources
SEWING channel
Grow Your Own Clothes (this lady is an every bigger maths freak than I am! And I mean that in a good way!)



Comments
Post a Comment